User Manual#
Installing KBMOD#
To build KBMOD you will require: * GPU and drivers * Cuda Toolkit >= 8.0 * CMake >= 3.12
Ensure your NVIDIA drivers are correctly installed and that the graphics cards are visible and working normally. The easiest way to achieve this would be to run
nvidia-smi
Ensure that the NVIDIA’s nvcc compiler is available on your system and is visible by running
nvcc --version
It is possible that the compiler is installed but not discoverable. In that case add its location to the system environment PATH variable by, if using bash for example, setting
export PATH=/path/to/cuda:$PATH
If CUDA Toolkit is not availible on your system follow their offical installation instructions. Optionally, if you use Anaconda virtual environments, the CUDA Toolkit is also availible as conda install cudatoolkit-dev. Depending on the version of drivers on your GPU, you might need to use an older cudatoolkit-dev version.
Running KBMOD#
To run a search, KBMOD must be provided with
appropriately pre-processed input data (see Input Files)
appropriate search and filter parameters (see Masking)
The search is initiated via the run_search class and consists of several phases:
Data is loaded from the input files as specified above (see Input Files for more details).
Masks are applied to the images to remove invalid pixels (see Masking for more details).
The shift and stack approach is used to search for potential trajectories originating from each pixel in the first image.
The list of potential trajectories is filtered using various metrics.
Remaining trajectories are clustered to remove duplicates. Only one trajectory per cluster is kept.
The found trajectories are compared against known objects and matches are indicated.
The found trajectories are output to result files for later analysis.
Data Model#
KBMOD uses an hierarchy of three nested data structures to store the image data over which it searches.
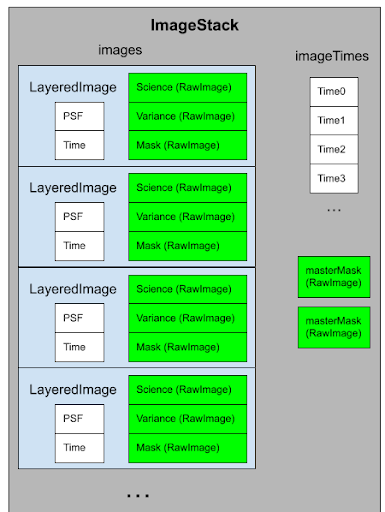
ImageStack#
The image_stack holds all of the image data for every time step. The main information stored is the images array, which holds one layered_image structure for each time step. The ImageStack also stores information that applies for all images such as a globalMask and an avgTemplate.
LayeredImage#
Each layered image holds the data from a single exposure, which consists of multiple layers including: a science image (the flux values), the variance image (representing the noise at each pixel), and MaskImage (representing per-pixel errors). In addition the layered_image tracks per-exposure information such as the PSF for the image and the time at which the image was taken.
RawImages#
A raw_image is the lowest level of data storage and effectively consists of a two-dimensional array of floating point values. These values can take on a variety of meanings depending on the use, including flux values, variance values, mask indicators, psi values, and phi values.